Hello Guys...
Hope you all doing good.. :)
Before going further of previous post I thought you guys should know about some important standard interface of Webdynpro and syntax for writing code. Don't worry its not too tough and there is something called CODE WIZARD that will generate your 70% to 90% your code. Its cool na :)
So Here I have listed some standard interfaces. You just visit the link and find out their methods of that particular interface. And these method we are going to use in future post.
1. IF_WD_CONTEXT_ELEMENT
2. IF_WD_CONTEXT_NODE
3. IF_WD_CONTEXT_NODE_INFO
4. IF_WD_WINDOW_MANAGER
5. IF_WD_MESSAGE_MANAGER
6. IF_WD_COMPONENT_USAGE
7. IF_WD_PORTAL_INTEGRATION
8. IF_WD_VIEW
9. IF_WD_WINDOW
10. IF_WD_CONTROLLER
11. IF_WD_COMPONENT
12. IF_WD_APPLICATION
The above interfaces are standard and you are going to use methods of those interfaces so it will good to you if you go to one by one in all interfaces and check out their methods.
Apart from interfaces there is some standard references in WebdynPro programming. And that should be follow these standard references. like
New Webdynpro ( EHP4 onwards) | Old WD (Netweaver 04, 05)
____________________|____________________________|________________________
Component Controller | wd_comp_controller | wd_comp_controller
---------------------------|---------------------------------------- |-----------------------------
Node | lo_nd_(node_name) | node_(node_name)
-------------------------- |---------------------------------------- |-----------------------------
Element | lo_el_(node_name) | elem_(node_name)
---------------------------|------------------------------ ----------|-----------------------------
Work Area | ls_(node_name) | stru_(node_name)
--------------------------|-----------------------------------------|------------------------------
Internal Table | lt_(node_name) | it_(node_name)
____________________|______________________________ |_______________________
Syntax For
1. Node Declaration
Data lo_nd_(node_name) Type Ref To IF_WD_CONTEXT_NODE.
2. Element Declaration
Data lo_el_(node_name) Type Ref To IF_WD_CONTEXT_ELEMENT.
3. Work Area Declaration
Data ls_(node_name) Type wd_this->element_(node_name).
4. Internal Table Declaration
Data lt_(node_name) Type wd_this->elements_(node_name).
5. Get Node Reference
lo_nd_(node_name) = wd_context->get_child_node(name = '(NODE_NAME)' ).
6. Get Element Reference
lo_el_(node_name) = lo_nd_(node_name)->get_element( ).
7. Get the record into work area
lo_el_(node_name)->get_static_attributes( importing static_attributes = ls_(node_name) ).
8. Getting all record into internal table
lo_nd_(node_name)->get_static_attributes_table(importing table = lt_(node_name) ).
Note: Change the (node_name) as your node name. For example If your node name is ITAB then
lo_nd_(node_name) = lo_nd_itab
Code Wizard:
I was talking about code wizard. Through code wizard all the above syntax you can generate and even more. The below figure is about code wizard
 The above figure is tool bar where you can find the Icon of Code Wizard is in red square by clicking you can open Code Wizard.

Hope you all doing good.. :)
Before going further of previous post I thought you guys should know about some important standard interface of Webdynpro and syntax for writing code. Don't worry its not too tough and there is something called CODE WIZARD that will generate your 70% to 90% your code. Its cool na :)
So Here I have listed some standard interfaces. You just visit the link and find out their methods of that particular interface. And these method we are going to use in future post.
1. IF_WD_CONTEXT_ELEMENT
2. IF_WD_CONTEXT_NODE
3. IF_WD_CONTEXT_NODE_INFO
4. IF_WD_WINDOW_MANAGER
5. IF_WD_MESSAGE_MANAGER
6. IF_WD_COMPONENT_USAGE
7. IF_WD_PORTAL_INTEGRATION
8. IF_WD_VIEW
9. IF_WD_WINDOW
10. IF_WD_CONTROLLER
11. IF_WD_COMPONENT
12. IF_WD_APPLICATION
The above interfaces are standard and you are going to use methods of those interfaces so it will good to you if you go to one by one in all interfaces and check out their methods.
Apart from interfaces there is some standard references in WebdynPro programming. And that should be follow these standard references. like
New Webdynpro ( EHP4 onwards) | Old WD (Netweaver 04, 05)
____________________|____________________________|________________________
Component Controller | wd_comp_controller | wd_comp_controller
---------------------------|---------------------------------------- |-----------------------------
Node | lo_nd_(node_name) | node_(node_name)
-------------------------- |---------------------------------------- |-----------------------------
Element | lo_el_(node_name) | elem_(node_name)
---------------------------|------------------------------ ----------|-----------------------------
Work Area | ls_(node_name) | stru_(node_name)
--------------------------|-----------------------------------------|------------------------------
Internal Table | lt_(node_name) | it_(node_name)
____________________|______________________________ |_______________________
Syntax For
1. Node Declaration
Data lo_nd_(node_name) Type Ref To IF_WD_CONTEXT_NODE.
2. Element Declaration
Data lo_el_(node_name) Type Ref To IF_WD_CONTEXT_ELEMENT.
3. Work Area Declaration
Data ls_(node_name) Type wd_this->element_(node_name).
4. Internal Table Declaration
Data lt_(node_name) Type wd_this->elements_(node_name).
5. Get Node Reference
lo_nd_(node_name) = wd_context->get_child_node(name = '(NODE_NAME)' ).
6. Get Element Reference
lo_el_(node_name) = lo_nd_(node_name)->get_element( ).
7. Get the record into work area
lo_el_(node_name)->get_static_attributes( importing static_attributes = ls_(node_name) ).
8. Getting all record into internal table
lo_nd_(node_name)->get_static_attributes_table(importing table = lt_(node_name) ).
Note: Change the (node_name) as your node name. For example If your node name is ITAB then
lo_nd_(node_name) = lo_nd_itab
Code Wizard:
I was talking about code wizard. Through code wizard all the above syntax you can generate and even more. The below figure is about code wizard
This is Code Wizard dialog box which contains two tabs Context and General.
Let see what are the options in Context Tab.
1. Node + Read = Get_Static_Attributes( ).
2. Node + Set = Set_Static_Attributes( ).
3. Node + Append = Bind_Structure( ).
4. Node + Read + As Table Operation = Get_Static_Attributes_Table( ).
5. Node + Set + As Table Operation = Bind_Table( ).
6. Attribute + Read = Get_Attribute( ).
7. Attribute + Set = Set_Attribute( ).
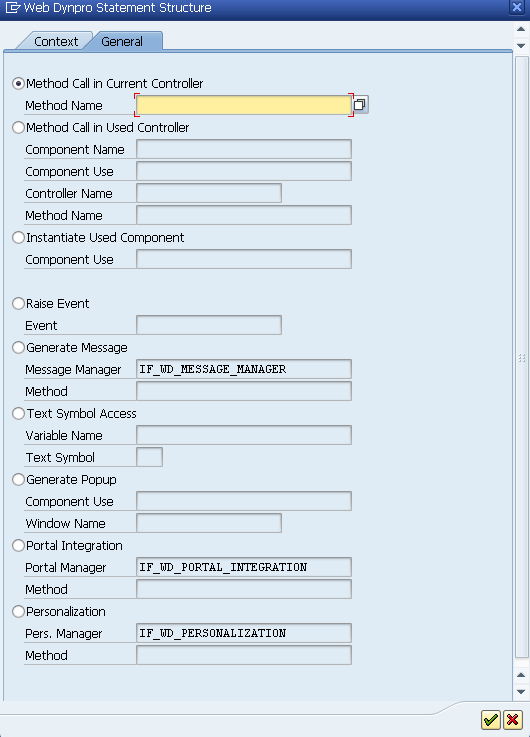
Let see what are the options in General Tab.
As you can see in figure there are many options available.Like
1. Method Call in Current Controller --> To Trigger the method of same controller.
2. Method Call in Used Controller --> To Trigger the method of different component which are used in current controller
3. Instantiate Used Component --> To activate the used component like SALV_WD_TABLE in memory.
4. Generate Message --> To display message like success, warning, Error
5. Text Symbol Access --> To Access text message from Assistance Class.
6. Generate Popup --> To open popup window, To open external window, To open popup window of used component.
7. Portal Integration --> To implement portal integration functionalities.
8. Personalization --> To provide user specific settings for application.
To Know more about Code Wizard.
That's all. Hope you guys find helpful...
Thanks & Don't forget to comments.. : )


